Sources and Sinks
Communications Toolbox™ provides sources, sinks, and display devices that facilitate analysis of communication system performance.
Data Sources
Use the functions and blocks listed in Sources and Sinks to generate random data to simulate a signal source.
Random Symbols
The randsrc function generates random matrices whose entries are chosen independently from an alphabet that you specify, with a distribution that you specify. A special case generates bipolar matrices.
For example, the command below generates a 5-by-4 matrix whose entries are random, independently chosen, and uniformly distributed in the set {1,3,5}.
a = randsrc(5,4,[1,3,5])
a = 5×4

     5     1     1     1
     5     1     5     3
     1     3     5     5
     5     5     3     5
     3     5     5     5
To skew the distribution so that 1 is twice as likely to occur as either 3 or 5, use the command below. The third input argument has two rows, one of which indicates the possible values of b and the other indicates the probability of each value.
b = randsrc(5,4,[1,3,5; .5,.25,.25])
b = 5×4

     3     5     3     5
     1     3     1     3
     5     1     1     1
     5     3     1     5
     3     1     1     1
Random Integers
In MATLAB®, the randi function generates random integer matrices whose entries are in a range that you specify. A special case generates random binary matrices.
For example, the command below generates a 5-by-4 matrix containing random integers between 2 and 10.
c = randi([2,10],5,4)
c = 5×4

     5     6     4     6
     5     6     8    10
     8     7     7     5
     9     8     3     7
     3     8     3     4
If your desired range is [0,10] instead of [2,10], you can use either of the commands below. They produce different numerical results, but use the same distribution.
d = randi([0,10],5,4);
e = randi([0 10],5,4);
In Simulink®, the Random Integer Generator and Poisson Integer Generator blocks both generate vectors containing random nonnegative integers. The Random Integer Generator block uses a uniform distribution on a bounded range that you specify in the block mask. The Poisson Integer Generator block uses a Poisson distribution to determine its output. In particular, the output can include any nonnegative integer.
Random Bit Error Patterns
In MATLAB, the randerr function generates matrices whose entries are either 0 or 1. However, its options are different from those of randi, because randerr is meant for testing error-control coding. For example, the command below generates a 5-by-4 binary matrix, where each row contains exactly one 1.
f = randerr(5,4)
f = 5×4

     0     0     0     1
     1     0     0     0
     1     0     0     0
     0     0     1     0
     0     0     0     1
You might use such a command to perturb a binary code that consists of five four-bit codewords. Adding the random matrix f to your code matrix (modulo 2) introduces exactly one error into each codeword.
On the other hand, to perturb each codeword by introducing one error with probability 0.4 and two errors with probability 0.6, use the command below instead. Each row has one '1' with probability 0.4, otherwise two '1's
g = randerr(5,4,[1,2; 0.4,0.6])
g = 5×4

     1     0     1     0
     0     1     0     1
     0     0     0     1
     1     0     0     1
     0     0     1     0
Adding the random matrix g to your code matrix (modulo 2) introduces one or two errors into each codeword with the specified probability of occurrence for each. The probability matrix that is the third argument of randerr affects only the number of 1s in each row, not their placement.
As another application, you can generate an equiprobable binary 100-element column vector using any of the commands below. The three commands produce different numerical outputs, but use the same distribution. The third input arguments vary according to each function's particular way of specifying its behavior.
binarymatrix1 = randsrc(100,1,[0 1]); % Possible values are 0,1
binarymatrix2 = randi([0 1],100,1); % Two possible values
binarymatrix3 = randerr(100,1,[0 1; 0.5 0.5]); % No 1s, or one 1
In Simulink, the Bernoulli Binary Generator block generates random bits and is suitable for representing sources. The block considers each element of the signal to be an independent Bernoulli random variable. Also, different elements need not be identically distributed.
Noise Sources
Construct noise generator blocks in Simulink® to simulate communication links.
Random Noise Generators
You can construct random noise generators to simulate channel noise by using the MATLAB Function (Simulink) block with random number generating functions. Construct different types of channel noise by using the following combinations.
| Distribution | Block | Function |
|---|---|---|
| Gaussian | MATLAB Function (Simulink) | wgn |
| Rayleigh | MATLAB Function (Simulink) | randn |
| Rician | MATLAB Function (Simulink) | randn |
| Uniform on a bounded interval | MATLAB Function (Simulink) | rand |
See Random Noise Generators for an example of how Rayleigh and Rician distributed noise is created.
Gaussian Noise Generator
In MATLAB®, the wgn function generates random matrices using a white Gaussian noise distribution. You specify the power of the noise in either dBW (decibels relative to a watt), dBm, or linear units. You can generate either real or complex noise.
For example, the command below generates a column vector of length 50 containing real white Gaussian noise whose power is 2 dBW. By default, the power type in dBW and load impedance is 1 ohm.
y1 = wgn(50,1,2);
To generate complex white Gaussian noise whose power is 2 watts, across a load of 60 ohms, use either of the commands below.
y2 = wgn(50,1,2,60,'complex','linear');
y3 = wgn(50,1,2,60,'linear','complex');
To send a signal through an additive white Gaussian noise channel, use the awgn function. See AWGN Channel for more information.
Sequence Generators
Use the functions, System objects, and blocks listed in Sources and Sinks to generate sequences for spreading or synchronization in a communication system. You can generate pseudorandom sequences, synchronization codes, and orthogonal codes. For examples comparing correlation properties of these sequence generators, see Spreading Sequences.
Pseudorandom Sequences
You can generate pseudorandom or pseudonoise (PN) sequences using these System objects in MATLAB® and these blocks in Simulink. The applications of these sequences range from multiple-access spread spectrum communication systems to ranging, synchronization, and data scrambling.
| Sequence | System object™ | Block |
|---|---|---|
| Gold sequences | comm.GoldSequence | Gold Sequence Generator |
| Kasami sequences | comm.KasamiSequence | Kasami Sequence Generator |
| PN sequences | comm.PNSequence | PN Sequence Generator |
To generate pseudorandom sequences, the underlying code implements shift registers, as illustrated in this diagram.

All r registers in the generator update their values at each time step according to the value of the incoming arrow to the shift register. The adders perform addition modulo 2. The shift register can be described by a binary polynomial in z, grzr + gr-1zr-1 + ... + g0. The coefficient gi is 1 if there is a connection, or 0 if there is no connection, from the ith shift register to the adder.
The coefficient mi is 1 if there is a delay, or a 0 if there is no delay, from the ith shift register to the adder preceding the output. If the shift is zero, the m0 switch is closed while all other mk switches are open.
The Kasami and PN sequence generators use this polynomial description for their generator polynomial. The Gold sequence generator uses this polynomial description for the preferred first and second generator polynomial PN sequences.
Model PN Sequence Generation With Linear Feedback Shift Register
This example shows that sequences output from the PN Sequence Generator can be modeled using a linear feedback shift register (LFSR) built with primitive Simulink® blocks.

For the chosen generator polynomial, p(z)=z^6+z+1, the model generates a PN sequence of period 63, by using the PN Sequence Generator block and by modeling a LFSR using primitive Simulink blocks. The two parameters, Initial states and Output mask vector (or scalar shift value), are interpreted in the LFSR model schematic. The PreLoadFcn callback function is used to initialize runtime parameters. To view the callback functions, go to MODELING> SETUP> Model Settings> Model Properties, and select the Callbacks tab.
The scope output shows the two implementations produce matching PN sequences.

Using the PN Sequence Generator block allows you to easily generate PN sequences of large periods. To experiment further, open the model. Modify settings to see how the performance varies for different path delays or adjust the PN sequence generator parameters. You can experiment with different initial states, by changing the value of Initial states prior to running the simulation. For all values, the two generated sequences are the same.
Synchronization Codes
Use the comm.BarkerCode
System object and Barker Code Generator block to generate Barker
codes to perform synchronization. Barker codes are subsets of PN sequences. They are short
codes, with a length at most 13, which are low-correlation sidelobes. A correlation
sidelobe is the correlation of a codeword with a time-shifted version of itself.
Orthogonal Codes
Orthogonal codes are used for spreading to benefit from their perfect correlation properties. When used in multi-user spread spectrum systems, where the receiver is perfectly synchronized with the transmitter, the despreading operation is ideal.
| Code | System object | Block |
|---|---|---|
| Hadamard codes | comm.HadamardCode | Hadamard Code Generator |
| OVSF codes | comm.OVSFCode | OVSF Code Generator |
| Walsh codes | comm.WalshCode | Walsh Code Generator |
Scopes
The Comm Sinks block library contains scopes for viewing three types of signal plots:
The following table lists the blocks and the plots they generate.
| Block Name | Plots |
|---|---|
| Eye Diagram Scope | Eye diagram of a signal |
| Constellation Diagram | Constellation diagram and signal trajectory of a signal |
Eye Diagrams
An eye diagram is a simple and convenient tool for studying the effects of intersymbol interference and other channel impairments in digital transmission. When this software product constructs an eye diagram, it plots the received signal against time on a fixed-interval axis. At the end of the fixed interval, it wraps around to the beginning of the time axis. As a result, the diagram consists of many overlapping curves. One way to use an eye diagram is to look for the place where the eye is most widely opened, and use that point as the decision point when demapping a demodulated signal to recover a digital message.
The Eye Diagram Scope block produces eye diagrams. This block processes discrete-time signals and periodically draws a line to indicate a decision, according to a mask parameter.
Examples appear in View a Sinusoid and View a Modulated Signal.
Scatter Plots
A constellation diagram of a signal plots the signal's value at its decision points. In the best case, the decision points should be at times when the eye of the signal's eye diagram is the most widely open.
The Constellation Diagram block produces a constellation diagram from discrete-time signals. An example appears in View a Sinusoid.
Signal Trajectories
A signal trajectory is a continuous plot of a signal over time. A signal trajectory differs from a scatter plot in that the latter displays points on the signal trajectory at discrete intervals of time.
The Constellation Diagram block produces signal
trajectories. The Constellation Diagram block produces signal trajectories
when the ShowTrajectory property is set to true. A signal trajectory
connects all points of the input signal, irrespective of the specified decimation factor
(Samples per symbol)
View a Sinusoid
The following model produces a constellation diagram and an eye diagram from a complex sinusoidal signal. Because the decision time interval is almost, but not exactly, an integer multiple of the period of the sinusoid, the eye diagram exhibits drift over time. More specifically, successive traces in the eye diagram and successive points in the scatter diagram are near each other but do not overlap.

To open the model, enter
doc_eyediagram at the MATLAB command line. To build the model, gather and configure these blocks:
Sine Wave, in the Sources library of the DSP System Toolbox™ (not the Sine Wave block in the Simulink Sources library)
Set Frequency to
.502.Set Output complexity to
Complex.Set Sample time to
1/16.
Constellation Diagram, in the Comm Sinks library
On the Constellation Properties panel, set Samples per symbol to
16.
Eye Diagram Scope, in the Comm Sinks library
On the Plotting Properties panel, set Samples per symbol to
16.On the Figure Properties panel, set Scope position to
figposition([42.5 55 35 35]);.
Connect the blocks as shown in the preceding figure. In the
Simulate section, set Stop time to
250. The Simulate section appears on
multiple tabs. Running the model produces the following scatter diagram plot.

The points of the scatter plot lie on a circle of radius 1. Note that the points fade as time passes. This is because the box next to Color fading is checked under Rendering Properties, which causes the scope to render points more dimly the more time that passes after they are plotted. If you clear this box, you see a full circle of points.
The Constellation Diagram block displays a circular trajectory.
In the eye diagram, the upper set of traces represents the real part of the signal and the lower set of traces represents the imaginary part of the signal.

View a Modulated Signal
This multipart example creates an eye diagram, scatter plot, and signal trajectory plot for a modulated signal. It examines the plots one by one in these sections:
Eye Diagram of a Modulated Signal
The following model modulates a random signal using QPSK, filters the signal with a raised cosine filter, and creates an eye diagram from the filtered signal.

To open the model, enter
doc_signaldisplays at the MATLAB command line. To build the model, gather and configure the following
blocks:
Random Integer Generator, in the Random Data Sources sublibrary of the Comm Sources library
Set M-ary number to
4.Set Sample time to
0.01.
QPSK Modulator Baseband, in PM in the Digital Baseband sublibrary of the Modulation library of Communications Toolbox, with default parameters
AWGN Channel, in the Channels library of Communications Toolbox, with the following changes to the default parameter settings:
Set Mode to
Signal-to-noise ratio (SNR).Set SNR (dB) to
15.
Raised Cosine Transmit Filter, in the Comm Filters library
Set Filter shape to
Normal.Set Rolloff factor to
0.5.Set Filter span in symbols to
6.Set Output samples per symbol to
8.Set Input processing to
Elements as channels
                    (sample based)
.
Eye Diagram Scope, in the Comm Sinks library
Set Samples per symbol to
8.Set Symbols per trace to
3. This specifies the number of symbols that are displayed in each trace of the eye diagram. A trace is any one of the individual lines in the eye diagram.Set Traces displayed to
3.Set New traces per display to
1. This specifies the number of new traces that appear each time the diagram is refreshed. The number of traces that remain in the diagram from one refresh to the next is Traces displayed minus New traces per display.On the Rendering Properties panel, set Markers to
+to indicate the points plotted at each sample. The default value of Markers is empty, which indicates no marker.On the Figure Properties panel, set Eye diagram to display to
In-phase only.
When you run the model, the Eye Diagram displays the following diagram. Your exact image varies depending on when you pause or stop the simulation.

Three traces are displayed. Traces 2 and 3 are faded because Color
fading under Rendering Properties is selected. This
causes traces to be displayed less brightly the older they are. In this picture, Trace 1
is the most recent and Trace 3 is the oldest. Because New traces per
display is set to 1, only Trace 1 is appearing for the
first time. Traces 2 and 3 also appear in the previous display.
Because Symbols per trace is set to 3, each
trace contains three symbols, and because Samples per trace is set to
8, each symbol contains eight samples. Note that trace 1 contains 24
points, which is the product of Symbols per trace and
Samples per symbol. However, traces 2 and 3 contain 25 points each.
The last point in trace 2, at the right border of the scope, represents the same sample as
the first point in trace 1, at the left border of the scope. Similarly, the last point in
trace 3 represents the same sample as the first point in trace 2. These duplicate points
indicate where the traces would meet if they were displayed side by side, as illustrated
in the following picture.

You can view a more realistic eye diagram by changing the value of Traces
displayed to 40 and clearing the Markers
field.

When the Offset parameter is set to 0, the
plotting starts at the center of the first symbol, so that the open part of the eye
diagram is in the middle of the plot for most points.
Constellation Diagram of a Modulated Signal
The following model creates a scatter plot of the same signal considered in Eye Diagram of a Modulated Signal.
To build the model, follow the instructions in Eye Diagram of a Modulated Signal but replace the Eye Diagram block with the following block:
Constellation Diagram, in the Communications Toolbox/Comm Sinks library
Set Samples per symbol to
2Set Offset to
0. This specifies the number of samples to skip before plotting the first point.Set Symbols to display to
40.
When you run the simulation, the Constellation Diagram block displays the following plot.
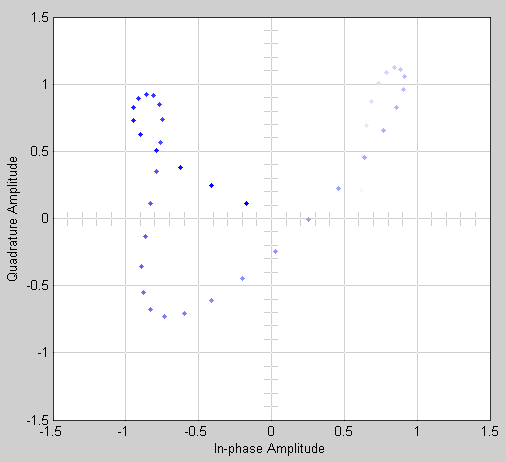
The plot displays 30 points. Because Color fading under Rendering Properties is selected, points are displayed less brightly the older they are.
Signal Trajectory of a Modulated Signal
The following model creates a signal trajectory plot of the same signal considered in Eye Diagram of a Modulated Signal.

To build the model, follow the instructions in Eye Diagram of a Modulated Signal but replace the Eye Diagram block with the following block:
Constellation Diagram , in the Communications Toolbox/Comm Sinks library
Set Samples per symbol to
8.Set Symbols to display to
40. This specifies the number of symbols displayed in the signal trajectory. The total number of points displayed is the product of Samples per symbol and Symbols to display.
When you run the model, the Constellation Diagram displays a trajectory like the one below.

The plot displays 40 symbols. Because Color fading under Rendering Properties is selected, symbols are displayed less brightly the older they are.
See Constellation Diagram of a Modulated Signal to compare the preceding signal trajectory to the scatter plot of the same signal. The Constellation Diagram block connects the points displayed by the Constellation Diagram block to display the signal trajectory.
If you increase Symbols to display to 100, the
model produces a signal trajectory like the one below. The total number of points
displayed at any instant is 800, which is the product of the parameters Samples
per symbol and Symbols to display.
