Specify or Import Component Data
Specify Parameter Values
There are two ways to set block parameter values:
Using the GUI — Enter information in the block dialog boxes, which open when you double-click a block in the Simulink® window.
Using commands — Use the Simulink
set_paramandget_paramcommands to set and get parameter values of the blocks, respectively. For more information on these commands, see theset_paramandget_paramreference pages.
Supported File Types for Importing Data
The blockset also lets you import the following types of data files:
Industry-standard file formats — Touchstone S2P, Y2P, Z2P, and H2P formats specify the network parameters and noise information for measured and simulated data.
For more information on Touchstone files, see
https://ibis.org/connector/touchstone_spec11.pdf.Agilent® P2D file format — Specifies amplifier and mixer large-signal, power-dependent network parameters, noise data, and intermodulation tables for several operating conditions, such as temperature and bias values.
The P2D file format lets you import system-level verification models of amplifiers and mixers.
Agilent S2D file format — Specifies amplifier and mixer network parameters with gain compression, power-dependent S21 parameters, noise data, and intermodulation tables for several operating conditions.
The S2D file format lets you import system-level verification models of amplifiers and mixers.
MathWorks™ amplifier (AMP) file format — Specifies amplifier network parameters, power data, noise data, and third-order intercept point
For more information about
.ampfiles, see AMP File Data Sections.MATLAB® circuits — RF Toolbox™ circuit objects in the MATLAB workspace specify network parameters, noise data, and third-order intercept point information of circuits with different topologies.
For more information about RF circuit objects, see RF Circuit Objects.
Import Data Files into RF Blocks
The blockset lets you import industry-standard data files, Agilent P2D and S2D files, and MathWorks AMP files into specific blocks to simulate the behavior of measured components in the Simulink modeling environment.
This section contains the following topics:
Blocks Used to Import Data
Three blocks in the Physical library accept data from a file. The following table lists the blocks and any corresponding data format that each supports.
| Block | Description | Supported Format(s) |
|---|---|---|
| General Amplifier | Generic amplifier | Touchstone, AMP, P2D, S2D |
| General Mixer | Generic mixer | Touchstone, AMP, P2D, S2D |
| General Passive Network | Generic passive component | Touchstone |
How to Import Data Files
To import a data file:
Choose the block that best represents your component from the list of blocks that accept file data shown in Blocks Used to Import Data.
Open the Physical library, and navigate to the sublibrary that contains the block.
Click and drag the block into your Simulink model.
In the block dialog box, enter the name of your data file for the Data file parameter. The file name must include the extension. If the file is not in your MATLAB path, specify the full path to the file or use the Browse button to find the file.
Note
The Data file parameter is only enabled when the Data source parameter is set to
Data
file
. This is the default setting and it means the block data comes from a file.
The following section shows an example of this procedure.
Example — Import a Touchstone Data File into an RF Model
In this example, you model the frequency response of a passive
component using data from a Touchstone file, defaultbandpass.s2p.
You use a model from one of the RF Blockset™ Equivalent Baseband examples to perform the following tasks:
Import Data into a General Passive Network Block
In this part of the example, you inspect the defaultbandpass.s2p file
and import data into the RF model using the General Passive Network
block.
Type the following at the MATLAB prompt to open the
defaultbandpass.s2pfile:edit defaultbandpass.s2p
The following figure shows a portion of the
.s2pfile.
The option line
# GHz S RI R 50
specifies the following information about the contents of the data file:
GHz — Frequency units.
S — Network parameters are S-parameters.
RI — Network parameters are specified as the real and imaginary parts.
R 50 — Reference impedance is 50 ohms.
For more information about the Touchstone specification, including the option line, see
https://ibis.org/connector/touchstone_spec11.pdf.At the MATLAB prompt, type
sparam_filter
This command opens the RF Blockset Equivalent Baseband example called “Touchstone Data File for 2-Port Bandpass Filter,” as shown in the following figure.
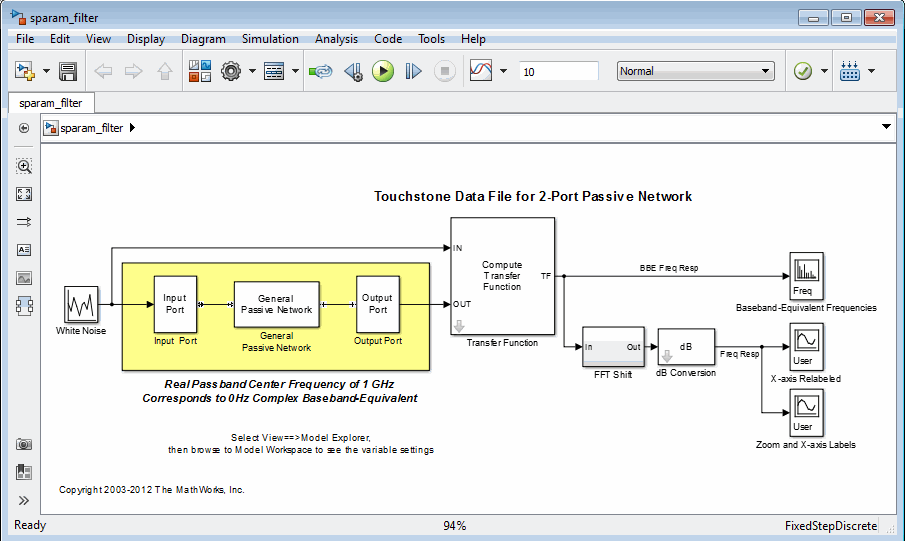
Double-click the General Passive Network block to display its parameters.
The Data source parameter is set to
Data
file
, so the Data file parameter specifies the data file to import. The Data file parameter is set todefaultbandpass.s2p. The block uses this data with the other block parameters during simulation.Note
When the imported file contains data that is measured at frequencies other than the modeling frequencies, use the Interpolation method parameter to specify how the block determines the data values at the modeling frequencies. For more information, see Determine Modeling Frequencies and Map Network Parameters to Modeling Frequencies.
Validate the Passive Component
In this part of the example, you plot the network parameters of the General Passive Network block to validate the data you imported in Import Data into a General Passive Network Block.
Open the General Passive Network block dialog box, and select the Visualization tab.
Set the Source of frequency data parameter to
User-specified.Set the Frequency data (Hz) parameter to
[0.5e9:0.1e6:1.5e9].Click Plot.
These actions create a plot of the magnitude and phase of S21 as a function of frequency.
S21 versus Frequency for the Imported Data

Import Circuits from the MATLAB Workspace
You can only connect Physical library blocks in cascade. However, the blockset works with RF Toolbox software to let you include additional circuit topologies in an RF model. To model circuit topologies that contain other types of connections, you must define a circuit in the MATLAB workspace and import it into an RF model.
To import a circuit from the MATLAB workspace:
Define the circuit object in the MATLAB workspace using the RF Toolbox functions.
For more information about RF circuit objects, see the RF Toolbox documentation for RF Circuit Objects.
Add a General Circuit Element block to your RF model from the Black Box Elements sublibrary of the Physical library. For information on how to open this library, see Open RF Blockset Equivalent Baseband Libraries.
Enter the circuit object name in the RFCKT object parameter in the General Circuit Element block dialog box.
This procedure is illustrated by example in the following section.
Example — Import a Bandstop Filter into an RF Model
In this example, you simulate the frequency response of a filter that you model using circuit objects from the MATLAB workspace.
The filter in this example is the 50-ohm bandstop filter shown in the following figure.
Bandstop Filter Diagram
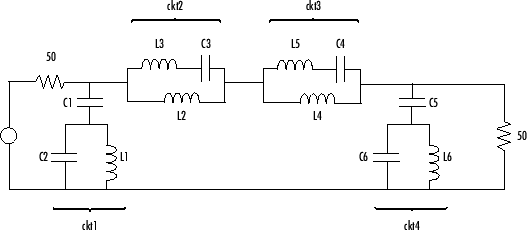
You represent the filter using four circuit objects that correspond
to the four parts of the filter, ckt1, ckt2, ckt3,
and ckt4 in the diagram. You use an input signal
with random, complex input values that have a Gaussian distribution
to stimulate the filter. The scope block displays the output signal.
This example illustrates how to perform the following tasks:
Create Circuit Objects in the MATLAB Workspace
In this part of the example, you define MATLAB variables to represent the physical properties of the filter shown in the previous figure, Bandstop Filter Diagram, and use functions from RF Toolbox software to create RF circuit objects that model the filter components.
Type the following at the MATLAB prompt to define the filter's capacitance and inductance values in the MATLAB workspace:
C1 = 1.734e-12;
C2 = 4.394e-12;
C3 = 7.079e-12;
C4 = 7.532e-12;
C5 = 1.734e-12;
C6 = 4.394e-12;
L1 = 25.70e-9;
L2 = 3.760e-9;
L3 = 17.97e-9;
L4 = 3.775e-9;
L5 = 17.63e-9;
L6 = 25.70e-9;
Type the following at the MATLAB prompt to create RF circuit objects that model the components labeled
ckt1,ckt2,ckt3, andckt4in the circuit diagram:ckt1 = ... rfckt.series('Ckts',{rfckt.shuntrlc('C',C1),... rfckt.shuntrlc('L',L1,'C',C2)}); ckt2 = ... rfckt.parallel('Ckts',{rfckt.seriesrlc('L',L2),... rfckt.seriesrlc('L',L3,'C',C3)}); ckt3 = ... rfckt.parallel('Ckts',{rfckt.seriesrlc('L',L4),... rfckt.seriesrlc('L',L5,'C',C4)}); ckt4 = ... rfckt.series('Ckts',{rfckt.shuntrlc('C',C5),... rfckt.shuntrlc('L',L6,'C',C6)});
For more information about the RF Toolbox objects used in this example, see the
rfckt.series,rfckt.parallel,rfckt.seriesrlc, andrfckt.shuntrlcobject reference pages in the RF Toolbox documentation.
Build the Model
In this portion of the example, you create a Simulink model. For more information about adding and connecting components, see Model RF Components.
Create a new model.
Add to the model the blocks shown in the following table. The Library column of the table specifies the hierarchical path to each block.
Block
Library
Quantity
Random Source DSP System Toolbox > Sources 1
Input Port RF Blockset > Equivalent Baseband > Input/Output Ports 1
General Circuit Element RF Blockset > Equivalent Baseband > Black Box Elements 4
Output Port RF Blockset > Equivalent Baseband > Input/Output Ports 1
Spectrum Analyzer DSP System Toolbox > Sinks 1
Connect the blocks as shown in the following figure.
Change the names of your General Circuit Element blocks to match those in the figure by double-clicking the text below the block and typing a new name.

Specify and Import Component Data
In this portion of the example, you specify block parameters. To open the parameter dialog box for each block, double-click the block.
In the Random Source block dialog box:
Set the Source type parameter to
Gaussian.Set the Sample time parameter to
1/100e6.Set the Samples per frame parameter to
256.Set the Complexity parameter to
Complex.
Selecting these settings creates an input signal with random, complex input values that have a Gaussian distribution.
In the Input Port block dialog box:
Set the Treat input Simulink signal as parameter to
Incident power wave.Set the Finite impulse response filter length parameter to
256.Set the Center frequency (Hz) parameter to
400e6.Set the Sample time parameter to
1/100e6.Clear the Add noise check box.
Selecting these settings defines the physical characteristics and modeling bandwidth of the filter.
Set the parameters of the General Circuit Element blocks as follows:
In the General Circuit Element1 block dialog box, set the RFCKT object parameter to
ckt1.In the General Circuit Element2 block dialog box, set the RFCKT object parameter to
ckt2.In the General Circuit Element3 block dialog box, set the RFCKT object parameter to
ckt3.In the General Circuit Element4 block dialog box, set the RFCKT object parameter to
ckt4.
Selecting these settings imports the circuit objects that model the filter components into the model.
In the Output Port block dialog box, set the Load impedance parameter to
50.Set the Spectrum Analyzer block parameters as follows:
In the View tab, under
Spectrum
Settings
, set the Averages underTrace optionsto100.This parameter establishes the number of spectra that the scope averages to produce the displayed signal. You use a value of 100 because the input signal is random and you want to display the average filter response over a large number of input values.
In the View tab, under
Spectrum
Settings
, set the Units underTrace optionstodBm/Hertz.In the View tab, under
Configuration
Properties
, set the Minimum Y-limit parameter to-75and the Maximum Y-limit parameter to-45.These values set the range of x- and y-values on the display such that the entire signal is visible when you run the simulation.
Set the Y-axis label parameter to
dBm/Hertz.
Run the Simulation and Plot the Results
In this part of the example, you run the simulation and examine the frequency response of the filter.
Click Run in the model window to start the simulation.
The Spectrum Scope window appears automatically and displays the following plot, which shows the frequency response of the filter.
Frequency Response of Bandstop Filter

The Spectrum Scope block displays the frequency response at
the shifted (baseband-equivalent) frequencies, not at the selected
passband frequencies. You can relabel the x-axis
of the Spectrum Scope window to display the passband signal by entering
the Center frequency parameter value of 400e6 (from
the Input Port block) for the Frequency display offset (Hz) parameter
in the Axis Properties tab of the Spectrum Scope
block. For more information on complex-baseband modeling, see Create Complex Baseband-Equivalent Model.
References
Geffe, P.R., “Novel designs for elliptic bandstop filters,” RF Design, February 1999.
See Also
Configuration | Input Port | Output Port