Define Components
Required Component Data
You must specify the following information when you create a component:
The path where you want to put the folder that contains all files for the component. For information on how to specify this folder, see Specify the Location of Component Files.
Properties of the component. For more information, see Specify Component Properties.
Display options for the component, including its display name, category, and description. For more information, see Set Component Display Options.
Specify the Location of Component Files
You can create components that perform similar functions and group them in
Package Directories. Each package folder must have a Parent
Directory that is in the MATLAB® path. When you build a new component, the MATLAB
Report Generator™ software creates files that make up the component. These files are stored in the
folder structure <parent>/@package_name/@class_name.
Specify these directories in the following fields in the Component File Location area of the Properties pane:
Class Directory field. Specify a class name for your component. The build process creates a folder with the name you specify and places the component's files in it. The class folder name must be unique for each component in the package. By convention, component class names begin with an uppercase or lowercase letter
c; for example,cUserDefinedComponent.Package Directory field. Specify the folder in which to store files for groups of components you create. Files for each component are stored in a subfolder with the name you entered into Class Directory Field.
Parent Directory field. Specify this folder when you create a package for the first time. This folder is the parent folder of the Package Directory.
Set Component Display Options
You can specify how you want your component to appear in the Report Explorer by entering data in the Component Display Options area of the Properties pane. Enter the following information:
Display Name. Specify a display name for the component to appear in the list of components for its associated category. Component categories and display names appear in the Options pane in the middle of the Report Explorer.
For information on specifying component categories, see step 3, Category Name.
The following example shows how to create a component called
My First
       Component
in a category calledMy Category.
Description. Enter a description for the component. This description appears when you click the component name or category name in the Options pane in the middle of the Report Explorer. Make the description informative, but brief.
Category Name. Specify the category of components to which the new component belongs. The component appears under this category in the Options pane in the middle of the Report Explorer.
Predefined choices appear in the Category name list. Select a component category from this list.

To create a custom component category, type the name for the category into the Category name field. This category name appears in the list of available categories in the Report Explorer.

child components.
Select the Component may contain children check box if you want the component to have child components. Child components appear under the component in the Report Explorer hierarchy. During report generation, the component runs all child components and includes their output in the report.
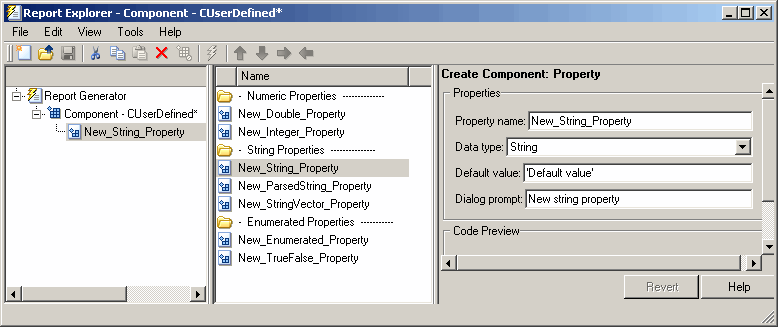
Specify Component Properties
Component properties determine how a component behaves and what information it inserts into
a report. To see the current value of a component's property, double-click it in the Outline
pane on the left in the Report Explorer. For example, the figure shows the property values for
New_String_Property.
Add Properties to Components
You add properties to a component from the properties list. Each property has a default value that you can modify as needed.
There are several ways to add properties to components:
Right-click the name of the component to which you want to add properties in the Outline pane on the left. Select Add new property from its context menu.

Right-click the name of a predefined property in the Options pane in the middle. From the context menu, select Add property.

Left-click the name of a property in the Options pane, and then drag it on top of a component in the Outline pane on the left.
Double-click the property name in the Options pane in the middle. The property is added to the component and property values appear in the Properties pane on the right.

Click the Add Property button on the Properties pane on the right.

Specify Component Properties
Property Name. Create a name for the new property. A property name must be a valid MATLAB variable name, and must be unique within a component.
Data Type. Specify the property's data type. Options are:
DoubleEnumerationIntegerCharacter vectorCharacter-vector vector%<ParsedString>Use this data type to include the value of a variable in the MATLAB workspace in a component.
True/False
Default Value. Set a default value for the property. The default value must be compatible with the data type. If incompatibilities exist between the default value and the data type, the component might not build.
Dialog Prompt. This text appears next to the widget on the component's dialog box. It indicates what the property does and how it affects report generation.
Note
When the component builds, a colon is appended to your entry in the Dialog prompt field. Your entry appears in the Properties pane with the colon appended.
Modify Existing Components
Report components are modifiable. You can derive a new component from an existing component by double-clicking the name of the component and modifying its values and properties.
Build Components
After you have entered all data required for defining the component, you build it by clicking the Build Component button. The build process creates all files needed for the component and stores them in the specified folder. For more information about specifying where components are stored, see Specify the Location of Component Files.
Note
Existing files in this location are overwritten.
Rebuild Existing Components
To add, remove, or change properties of an existing component, use the Rebuild Constructor button. This button becomes active only after you have previously created a component using the Build Component button. To activate the Rebuild Constructor button, specify the Package name and Class name for an existing component. These fields are located in the Component File Location area of the Properties pane.
If you select a component using Tools > Create component from, the component's fields are filled in automatically and the button becomes active.
After you have finished modifying the component, click the Rebuild Constructor button to rebuild the component. Writable files in the component's folder location are not overwritten.
Remove a Component
To remove a component:
Delete its class folder, <
root>/@package_name/@class_name. If the component you want to remove is the only component in the package, delete the entire package.Edit
<root>/@package_name/rptcomps2.xmlto remove the XML element that registers the component.