Code Sections
Divide Your File into Code Sections
MATLAB® files often consist of many commands. You typically
focus efforts on a single part of your program at a time, working
with the code in chunks. Similarly, when explaining your files to
others, often you describe your program in chunks. To facilitate these
processes, use code sections, also known as code
cells or cell mode. A code section contains contiguous lines of code
that you want to evaluate as a group in a MATLAB script, beginning
with two comment characters (%%).
To define code section boundaries explicitly, insert section breaks using these methods:
On the Editor tab, in the Edit section, in the Insert button group, click
 .
.Enter two percent signs (
%%) at the start of the line where you want to begin the new code section.
The text on the same line as %% is called the section
title. Including section titles is optional, however, it improves the
readability of the file and appears as a heading if you publish your code.
Evaluate Code Sections
As you develop a MATLAB file, you can use the Editor section features to evaluate the file section-by-section. This method helps you to experiment with and fine-tune your program. You can navigate among sections, and evaluate each section individually. To evaluate a section, it must contain all the values it requires, or the values must exist in the MATLAB workspace.
The section evaluation features run the section code currently highlighted in yellow. MATLAB does not automatically save your file when evaluating individual code sections. The file does not have to be on your search path.
This table provides instructions on evaluating code sections.
| Operation | Instructions |
|---|---|
| Run the code in the current section. |
|
| Run the code in the current section, and then move to the next section. |
|
| Run all the code in the file. |
|
Increment Values in Code Sections
You can increment numbers within a section, rerunning that section after every change. This helps you fine-tune and experiment with your code.
To increment or decrement a number in a section:
Highlight or place your cursor next to the number.
Right-click to open the context menu.
Select Increment Value and Run Section. A small dialog box appears.

Input appropriate values in the
 /
/ text box or
  /
/ text box.
Click the
, , , or button to add to, subtract
from, multiply, or divide the selected number in your section.MATLAB runs the section after every click.
Note
MATLAB software does not automatically save changes you make to the numbers in your script.
Navigate Among Code Sections in a File
You can navigate among sections in a file without evaluating the code within those sections. This facilitates jumping quickly from section to section within a file. You might do this, for example, to find specific code in a large file.
| Operation | Instructions |
|---|---|
| Move to the next section. |
|
| Move to the previous section. |
|
| Move to a specific section. |
|
Example of Evaluating Code Sections
This example defines two code sections in a file called sine_wave.m and
then increments a parameter to adjust the created plot. To open this
file in your Editor, run the following command, and then save the
file to a local folder:
edit(fullfile(matlabroot,'help','techdoc','matlab_env',...
'examples','sine_wave.m'))
After the file is open in your Editor:
Insert a section break and the following title on the first line of the file.
%% Calculate and Plot Sine Wave
Insert a blank line and a second section break after
plot(x,y). Add a section title,Modify Plot Properties, so that the entire file contains this code:%% Calculate and Plot Sine Wave % Define the range for x. % Calculate and plot y = sin(x). x = 0:1:6*pi; y = sin(x); plot(x,y) %% Modify Plot Properties title('Sine Wave') xlabel('x') ylabel('sin(x)') fig = gcf; fig.MenuBar = 'none';Save the file.
Place your cursor in the section titled
Calculate and Plot Sine
                            Wave
. On the Editor tab, in the Run section, click Run Section.
A figure displaying a course plot of
sin(x)appears.
Smooth the sine plot.
Highlight
1in the statement:x = 0:1:6*pi;.Right-click and select Increment Value and Run Section. A small dialog box appears.
Type
2in the/ text box.Click the
button several times. The sine plot becomes smoother after each subsequent click.

Close the Figure and save the file.
Run the entire
sine_wave.mfile. A smooth sine plot with titles appears in a new Figure.
Change the Appearance of Code Sections
You can change how code sections appear within the MATLAB Editor. MATLAB highlights code sections in yellow, by default, and divides them with horizontal lines. When the cursor is positioned in any line within a section, the Editor highlights the entire section.
To change how code sections appear:
On the Home tab, in the Environment section, click
 Preferences.
The Preference dialog box appears.
In the left pane, select MATLAB > Colors > Programming Tools.
Under Section display options, select the appearance of your code sections.

You can choose whether to highlight the sections, the color of the highlighting, and whether dividing lines appear between code sections.
Use Code Sections with Control Statements and Functions
Unexpected results can appear when using code sections within control statements and functions because MATLAB automatically inserts section breaks that do not appear in the Editor unless you insert section breaks explicitly. This is especially true when nested code is involved. Nested code occurs wherever you place a control statement or function within the scope of another control statement or function.
MATLAB automatically defines section boundaries in a code block, according to this criteria:
MATLAB inserts a section break at the top and bottom of a file, creating a code section that encompasses the entire file. However, the Editor does not highlight the resulting section, which encloses the entire file, unless you add one or more explicit code sections to the file.
If you define a section break within a control flow statement (such as an
iforwhilestatement), MATLAB automatically inserts section breaks at the lines containing the start and end of the statement.If you define a section break within a function, MATLAB inserts section breaks at the function declaration and at the function end statement. If you do not end the function with an
endstatement, MATLAB behaves as if the end of the function occurs immediately before the start of the next function.
If an automatic break occurs on the same line as a break you insert, they collapse into one section break.
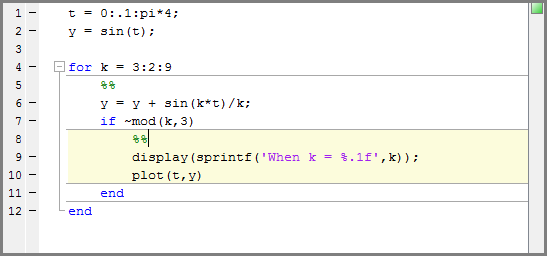
Nested Code Section Breaks
The following code illustrates the concept of nested code sections:
t = 0:.1:pi*4;
y = sin(t);

for k = 3:2:9
    %%
    y = y + sin(k*t)/k;
    if ~mod(k,3)
        %%
        display(sprintf('When k = %.1f',k));
        plot(t,y)
    end
endAt the outermost level of nesting, one section spans the entire file.
MATLAB only defines section in a code block if you specify section breaks at the same level within the code block. Therefore, MATLAB considers the cursor to be within the section that encompasses the entire file.
At the second level of nesting, a section exists within the
forloop.
At the third-level of nesting, one section exists within the
ifstatement.