Shear
Shift rows or columns of image by linearly varying offset
Library
Geometric Transformations
visiongeotforms

Description
The Shear block shifts the rows or columns of an image by a gradually increasing distance left or right or up or down.
Note
This block supports intensity and color images on its ports.
| Port | Input/Output | Supported Data Types | Complex Values Supported |
|---|---|---|---|
Image | M-by-N matrix of intensity values or an M-by-N-by-P color video signal where P is the number of color planes |
| No |
S | Two-element vector that represents the number of pixels by which you want to shift your first and last rows or columns | Same as I port | No |
Output | Shifted image | Same as I port | No |
If the data type of the input to the I port is floating point, the input to the S port of this block must be the same data type. Also, the block output is the same data type.
Use the Shear direction parameter to specify whether you want to shift
the rows or columns. If you select Horizontal, the first row
has an offset equal to the first element of the Row/column shear values [first
last] vector. The following rows have an offset that linearly increases
up to the value you enter for the last element of the Row/column shear values
[first last] vector. If you select Vertical,
the first column has an offset equal to the first element of the Row/column
shear values [first last] vector. The following columns have an offset
that linearly increases up to the value you enter for the last element of the
Row/column shear values [first last] vector.
Use the Output size after shear parameter to specify the size of the
sheared image. If you select Full, the block outputs a matrix
that contains the entire sheared image. If you select Same as input
image, the block outputs a matrix that is the same size as the input
image and contains the top-left portion of the sheared image. Use the
Background fill value parameter to specify the pixel values
outside the image.
Use the Shear values source parameter to specify how to enter your shear
parameters. If you select Specify via dialog, the
Row/column shear values [first last] parameter appears in the
dialog box. Use this parameter to enter a two-element vector that represents the number
of pixels by which you want to shift your first and last rows or columns. For example,
if for the Shear direction parameter you select
Horizontal and, for the Row/column shear values
[first last] parameter, you enter [50 150], the
block moves the top-left corner 50 pixels to the right and the bottom left corner of the
input image 150 pixels to the right. If you want to move either corner to the left,
enter negative values. If for the Shear direction parameter you
select Vertical and, for the Row/column shear
values [first last] parameter, you enter [-10 50],
the block moves the top-left corner 10 pixels up and the top right corner 50 pixels
down. If you want to move either corner down, enter positive values.
Use the Interpolation method parameter to specify which interpolation
method the block uses to shear the image. If you select Nearest
neighbor, the block uses the value of the nearest pixel for the new
pixel value. If you select Bilinear, the new pixel value is
the weighted average of the two nearest pixel values. If you select
Bicubic, the new pixel value is the weighted average of
the four nearest pixel values.
The number of pixels the block considers affects the complexity of the computation. Therefore, the nearest-neighbor interpolation is the most computationally efficient. However, because the accuracy of the method is proportional to the number of pixels considered, the bicubic method is the most accurate. For more information, see Nearest Neighbor, Bilinear, and Bicubic Interpolation Methods in the Computer Vision Toolbox™ User's Guide.
If, for the Shear values source parameter, you select Input
port, the S port appears on the block. At each time step, the input to
the S port must be a two-element vector that represents the number of pixels by which to
shift your first and last rows or columns.
If, for the Output size after shear parameter, you select
Full, and for the Shear values
source parameter, you select Input port, the
Maximum shear value parameter appears in the dialog box. Use
this parameter to enter a real, scalar value that represents the maximum number of
pixels by which to shear your image. The block uses this parameter to determine the size
of the output matrix. If any input to the S port is greater than the absolute value of
the Maximum shear value parameter, the block saturates to the
maximum value.
Fixed-Point Data Types
The following diagram shows the data types used in the Shear block for bilinear interpolation of fixed-point signals.

You can set the product output, accumulator, and output data types in the block mask.
Parameters
- Shear direction
Specify whether you want to shift the rows or columns of the input image. Select
Horizontalto linearly increase the offset of the rows. SelectVerticalto steadily increase the offset of the columns.- Output size after shear
Specify the size of the sheared image. If you select
Full, the block outputs a matrix that contains the sheared image values. If you selectSame as input image, the block outputs a matrix that is the same size as the input image and contains a portion of the sheared image.- Shear values source
Specify how to enter your shear parameters. If you select
Specify via dialog, the Row/column shear values [first last] parameter appears in the dialog box. If you selectInput port, port S appears on the block. The block uses the input to this port at each time step as your shear value.- Row/column shear values [first last]
Enter a two-element vector that represents the number of pixels by which to shift your first and last rows or columns. This parameter is visible if, for the Shear values source parameter, you select
Specify via dialog.- Maximum shear value
Enter a real, scalar value that represents the maximum number of pixels by which to shear your image. This parameter is visible if, for the Shear values source parameter, you select
Input port.- Background fill value
Specify a value for the pixels that are outside the image. This parameter is tunable.
- Interpolation method
Specify which interpolation method the block uses to shear the image. If you select
Nearest
                neighbor
, the block uses the value of one nearby pixel for the new pixel value. If you selectBilinear, the new pixel value is the weighted average of the two nearest pixel values. If you selectBicubic, the new pixel value is the weighted average of the four nearest pixel values.
- Rounding mode
Select the rounding mode for fixed-point operations.
- Overflow mode
Select the overflow mode for fixed-point operations.
- Shear values
Choose how to specify the word length and the fraction length of the shear values.
When you select
Same word length as
                                    input
, the word length of the shear values match that of the input to the block. In this mode, the fraction length of the shear values is automatically set to the binary-point only scaling that provides you with the best precision possible given the value and word length of the shear values.When you select
Specify word length, you can enter the word length of the shear values, in bits. The block automatically sets the fraction length to give you the best precision.When you select
Binary point scaling, you can enter the word length and the fraction length of the shear values, in bits.When you select
Slope and bias scaling, you can enter the word length, in bits, and the slope of the shear values. The bias of all signals in the Computer Vision Toolbox blocks is 0.
This parameter is visible if, for the Shear values source parameter, you select
Specify via dialog.- Product output

As depicted in the previous figure, the output of the multiplier is placed into the product output data type and scaling. Use this parameter to specify how to designate this product output word and fraction lengths.
When you select
Same as first input, these characteristics match those of the first input to the block at the I port.When you select
Binary point scaling, you can enter the word length and the fraction length of the product output, in bits.When you select
Slope and bias scaling, you can enter the word length, in bits, and the slope of the product output. The bias of all signals in the Computer Vision Toolbox blocks is 0.
- Accumulator
-
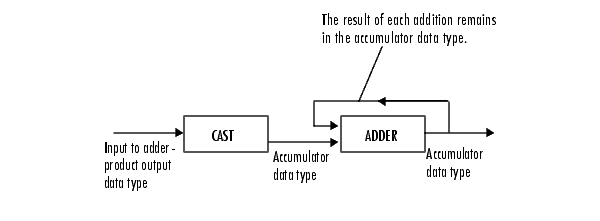
As depicted in the previous figure, inputs to the accumulator are cast to the accumulator data type. The output of the adder remains in the accumulator data type as each element of the input is added to it. Use this parameter to specify how to designate this accumulator word and fraction lengths.
When you select
Same as product output, these characteristics match those of the product output.When you select
Same as first input, these characteristics match those of the first input to the block at the I port.When you select
Binary point scaling, you can enter the word length and the fraction length of the accumulator, in bits.When you select
Slope and bias scaling, you can enter the word length, in bits, and the slope of the accumulator. The bias of all signals in the Computer Vision Toolbox blocks is 0.
- Output
Choose how to specify the word length and fraction length of the output of the block:
When you select
Same as first input, these characteristics match those of the first input to the block at the I port.When you select
Binary point scaling, you can enter the word length and the fraction length of the output, in bits.When you select
Slope and bias scaling, you can enter the word length, in bits, and the slope of the output. The bias of all signals in the Computer Vision Toolbox blocks is 0.
- Lock data type settings against change by the fixed-point tools
Select this parameter to prevent the fixed-point tools from overriding the data types you specify on the block mask. For more information, see
fxptdlg(Fixed-Point Designer), a reference page on the Fixed-Point Tool in the Simulink® documentation.
References
[1] Wolberg, George. Digital Image Warping. Washington: IEEE Computer Society Press, 1990.