Image Pad
Pad signal along its rows, columns, or both
Library
Utilities
visionutilities

Description
The Image Pad block expands the dimensions of a signal by padding
its rows, columns, or both. To crop an image, you can use the Simulink® Selector (Simulink) block, DSP System Toolbox™ Submatrix (DSP System Toolbox) block, or the Image Processing Toolbox™ imcrop function.
| Port | Input/Output | Supported Data Types | Complex Values Supported |
|---|---|---|---|
Image / I | M-by-N matrix of intensity values or an M-by-N-by-P color video signal, where P is the number of color planes. |
| Yes |
PVal | Scalar value that represents the constant pad value. | Same as I port. | Yes |
Output | Padded scalar, vector, or matrix. | Same as I port. | Yes |
Examples
Pad with a Constant Value
Suppose you want to pad the rows of your input signal with three
initial values equal to 0 and your input signal
is defined as follows:

Set the Image Pad block parameters as follows:
Method =
ConstantPad value source =
Specify via
                            dialog
Pad value =
0Specify =
Output
                        size
Add columns to =
LeftOutput row mode =
User-specifiedNumber of output columns =
6Add rows to =
No
                        padding
The Image Pad block outputs the following signal:

Pad by Repeating Border Values
Suppose you want to pad your input signal with its border values, and your input signal is defined as follows:

Set the Image Pad block parameters as follows:
Method =
ReplicateSpecify =
Pad sizeAdd columns to =
Both left and
                            right
Number of added columns =
2Add rows to =
Both top and
                            bottom
Number of added rows =
[1
                        3]
The Image Pad block outputs the following signal:

The border values of the input signal are replicated on the top, bottom, left, and right of the input signal so that the output is a 7-by-7 matrix. The values in the corners of this output matrix are determined by replicating the border values of the matrices on the top, bottom, left and right side of the original input signal.
Pad with Mirror Image
Suppose you want to pad your input signal using its mirror image, and your input signal is defined as follows:

Set the Image Pad block parameters as follows:
Method =
SymmetricSpecify =
Pad sizeAdd columns to =
Both left and
                            right
Number of added columns =
[5
                            6]
Add rows to =
Both top and
                            bottom
Number of added rows =
2
The Image Pad block outputs the following signal:
The block flips the original input matrix and each matrix it creates about their top, bottom, left, and right sides to populate the 7-by-13 output signal. For example, in the preceding figure, you can see how the block flips the input matrix about its right side to create the matrix directly to its right.
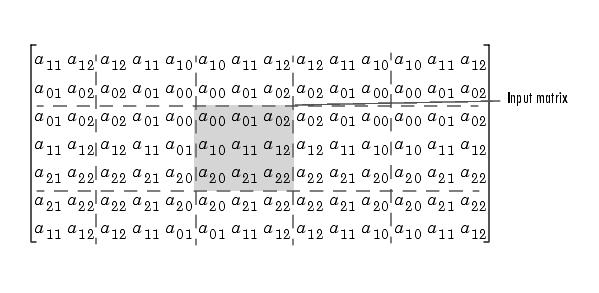
Pad Using a Circular Repetition of Elements
Suppose you want to pad your input signal using a circular repetition of its values. Your input signal is defined as follows:

Set the Image Pad block parameters as follows:
Method =
CircularSpecify =
Output
                        size
Add columns to =
Both left and
                            right
Number of output columns =
9Add rows to =
Both top and
                            bottom
Number of output rows =
9
The Image Pad block outputs the following signal:

The block repeats the values of the input signal in a circular pattern to populate the 9-by-9 output matrix.
Parameters
- Method
Specify how you want the block to pad your signal. The data type of the input signal is the data type of the output signal.
Use the Method parameter to specify how you pad the input signal.
Constant— Pad with a constant valueReplicate— Pad by repeating its border valuesSymmetric— Pad with its mirror imageCircular— Pad using a circular repetition of its elements
If you set the Method parameter to
Constant, the Pad value source parameter appears on the dialog box.Input port— The PVal port appears on the block. Use this port to specify the constant value with which to pad your signalSpecify via dialog— The Pad value parameter appears in the dialog box. Enter the constant value with which to pad your signal.
- Pad value source
If you select
Input port, the PVal port appears on the block. Use this port to specify the constant value with which to pad your signal. If you selectSpecify via dialog, the Pad value parameter becomes available. This parameter is visible if, for the Method parameter, you selectConstant.- Pad value
Enter the constant value with which to pad your signal. This parameter is visible if, for the Pad value source parameter, you select
Specify via dialog. This parameter is tunable.- Specify
If you select
Pad size, you can enter the size of the padding in the horizontal and vertical directions.If you select
Output size, you can enter the total number of output columns and rows. This setting enables you to pad the input signal. See the previous section for descriptions of the Add columns to and Add rows to parameters.- Add columns to
The Add columns to parameter controls the padding at the left, right or both sides of the input signal.
Left— The block adds additional columns on the left side.Right— The block adds additional columns on the right side.Both left and right— The block adds additional columns to the left and right side.No padding— The block does not change the number of columns.
Use the Add columns to and Number of added columns parameters to specify the size of the padding in the horizontal direction. Enter a scalar value, and the block adds this number of columns to the left, right, or both sides of your input signal. If you set the Add columns to parameter to
Both left and
                            right
, you can enter a two element vector. The left element controls the number of columns the block adds to the left side of the signal; the right element controls the number of columns the block adds to the right side of the signal.- Output row mode
Use the Output row mode parameter to describe how to pad the input signal.
User-specified— Use the Number of output rows parameter to specify the total number of rows.Next power of two— The block pads the input signal along the rows until the length of the rows is equal to a power of two. When the length of the input signal's rows is equal to a power of two, the block does not pad the input signal's rows.
- Number of added columns
This parameter controls how many columns are added to the right and/or left side of your input signal. Enter a scalar value, and the block adds this number of columns to the left, right, or both sides of your signal. If, for the Add columns to parameter you select
Both left and right, enter a two-element vector. The left element controls the number of columns the block adds to the left side of the signal and the right element controls how many columns the block adds to the right side of the signal. This parameter is visible if, for the Specify parameter, you selectPad size.- Add rows to
The Add rows to parameter controls the padding at the top and bottom of the input signal.
Top— The block adds additional rows to the top.Bottom— The block adds additional rows to the bottom.Both top and bottom— The block adds additional rows to the top and bottom.No padding— The block does not change the number of rows.
Use the Add rows to and Number of added rows parameters to specify the size of the padding in the vertical direction. Enter a scalar value, and the block adds this number of rows to the top, bottom, or both of your input signal. If you set the Add rows to parameter to
Both top and
                            bottom
, you can enter a two element vector. The left element controls the number of rows the block adds to the top of the signal; the right element controls the number of rows the block adds to the bottom of the signal.- Output column mode
Describe how to pad the input signal. If you select
User-specified, the Row size parameter appears on the block dialog box. If you select Next power of two, the block pads the input signal along the rows until the length of the rows is equal to a power of two. This parameter is visible if, for the Specify parameter, you select Output size.Use the Output column mode parameter to describe how to pad the input signal.
User-specified— Use the Number of column rows parameter to specify the total number of columns.Next power of two— The block pads the input signal along the columns until the length of the columns is equal to a power of two. When the length of the input signal's columns is equal to a power of two, the block does not pad the input signal's columns.
- Number of added rows
This parameter controls how many rows are added to the top, bottom, or both of your input signal. Enter a scalar value and the block adds this number of columns to the top, bottom, or both of your signal. If, for the Add rows to parameter you select
Both
                            top and bottom
, enter a two-element vector. The left element controls the number of rows the block adds to the top of the signal and the right element controls how many rows the block adds to the bottom of the signal. This parameter is visible if you set the Specify parameter toPad size.- Action when truncation occurs
The following options are available for the Action when truncation occurs parameter:
None— Select this option when you do not want to be notified that the input signal is truncated.Warning— Select this option when you want to receive a warning in the MATLAB® Command Window when the input signal is truncated.Error— Select this option when you want an error dialog box displayed and the simulation terminated when the input signal is truncated.