Add Interactive Controls to a Live Script
You can add sliders, drop-downs, check boxes, edit fields, and buttons to your live scripts to control variable values interactively. Adding interactive controls to a script is useful when you want to share the script with others. Use interactive controls to set and change the values of variables in your live script using familiar user interface components.
Insert Controls
To insert a control into a live script, go to the Live Editor tab, and in the Code section, click Control. Then, select from the available options. To replace an existing value with a control, select the value and then insert the control. The Control menu only shows options available for the selected value.
The table below shows the list of available controls:
| Control | Description | Configuration Details |
|---|---|---|
Numeric Slider
| Use numeric sliders to interactively change the value of a variable by moving the slider thumb to the desired numeric value. The value to the left of the slider is its current value. | In the Values section, specify a Min, Max, and Step value. |
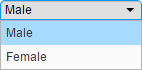
Drop-Down List
| Use drop-down lists to interactively change the value of a variable by selecting from a list of values. Hover over the text displayed in the drop-down list to see its current value. | In the Items section, in the Item Labels field, specify the text that you want to display for each item in the drop-down list. In the Item Values field, specify the values for each item in the drop-down line. Make sure to enclose text values in quotes or double quotes, because the Live Editor interprets each item in the list as code. |
Check Box
| Use check boxes to interactively set the value of a
variable to either the logical value The displayed state of the check box (checked or not checked) determines its current value. | N/A |
Edit Field
| Use edit fields to interactively set the value of a variable to any typed input. The text displayed in the edit field and the selected data type determines its current value. | In the Type section, in the Data type field, select from the available options to specify the data type of the text in the edit field. |
Button
| Use button controls to interactively run code on button click. When using button controls, consider setting the Run field for all other controls in the live script to None. Then, the code only runs when the user clicks the button control. This can be useful when the live script requires multiple control values to be set before running the code. | To change the label displayed on the button, in the Label section, enter a label name. |
Modify Control Execution
You can modify when and what code runs when the value of a control changes. By default, when the value of a control changes, the Live Editor runs the code in the current section. To configure this behavior, right-click the control and select Configure Control. Then, in the Execution section, modify the values of the fields described in the table below. Press Tab or Enter, or click outside of the control configuration menu to return to the live script.
| Field | Options |
|---|---|
| Run On (slider control only) | Select one of these options to specify when the code runs:
|
| Run | Select one of these options to specify what code runs when the value of the control changes:
Tip When using a button control in a live script, consider setting the Run field for all other controls in the live script to Nothing. Then, the code only runs when the user clicks the button control. This can be useful when the live script requires multiple control values to be set before running the code.
|
Modify Control Labels
You can hide the code in a live script and only display labeled controls, output,
and formatted text. Hiding the code is useful when sharing and exporting live
scripts. To hide the code, click the ![]() hide code button to the right of the live script.
You also can go to the View tab, and in the
View section, click
hide code button to the right of the live script.
You also can go to the View tab, and in the
View section, click ![]() Hide Code. To show the code again, click the
Hide Code. To show the code again, click the
![]() output inline button or the
output inline button or the ![]() output on right button.
output on right button.
When the code is hidden, labels display next to the control. To modify the label for a control, right-click the control and select Configure Control. Then, in the Label section, enter a label name. This is also the text that displays on button controls in all views. Press Tab or Enter, or click outside of the control configuration menu to return to the live script.
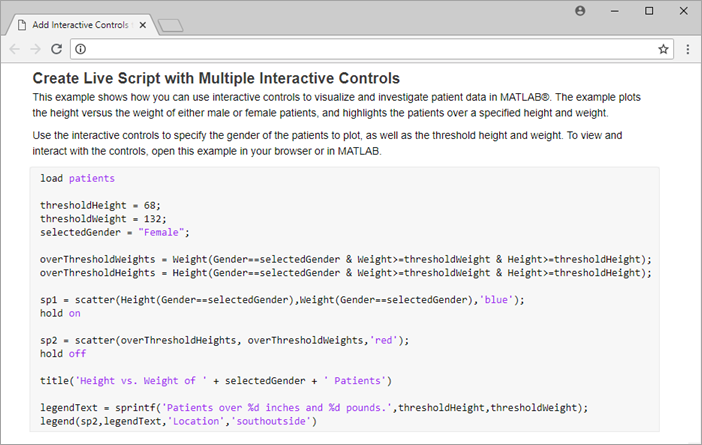
Create Live Script with Multiple Interactive Controls
This example shows how you can use interactive controls to visualize and investigate patient data in MATLAB®. The example plots the height versus the weight of either male or female patients, and highlights the patients over a specified height and weight.
Use the interactive controls to specify the gender of the patients to plot, as well as the threshold height and weight. To view and interact with the controls, open this example in your browser or in MATLAB.
load patients thresholdHeight =68; thresholdWeight =
132; selectedGender =
"Female"; overThresholdWeights = Weight(Gender==selectedGender & Weight>=thresholdWeight & Height>=thresholdHeight); overThresholdHeights = Height(Gender==selectedGender & Weight>=thresholdWeight & Height>=thresholdHeight); sp1 = scatter(Height(Gender==selectedGender),Weight(Gender==selectedGender),'blue'); hold on sp2 = scatter(overThresholdHeights, overThresholdWeights,'red'); hold off title('Height vs. Weight of ' + selectedGender + ' Patients') legendText = sprintf('Patients over %d inches and %d pounds.',thresholdHeight,thresholdWeight); legend(sp2,legendText,'Location','southoutside')

Share Live Script
When the live script is complete, share it with others. Users can open the live script in MATLAB® and experiment with using the controls interactively.
If you share the live script itself as an interactive document, consider hiding
the code in the live script before sharing it. When the code is hidden, the Live
Editor only displays labeled controls, output, and formatted text. To hide the code,
click the ![]() hide code button to the right of the live script. You also can
go to the View tab, and in the View
section, click
hide code button to the right of the live script. You also can
go to the View tab, and in the View
section, click ![]() Hide Code.
Hide Code.
If you share the live script as a static PDF, Microsoft® Word, HTML, or LaTeX document, the Live Editor saves the control as code. For example, in the live script shown here, the Live Editor replaces the slider controls with their current value (68 and 132) and replaces the drop-down control with the current value of the drop-down ("Female").