View Control with the Camera Toolbar
Camera Toolbar
The Camera toolbar enables you to perform a number of viewing operations interactively. To use the Camera toolbar,
Display the toolbar by selecting Camera Toolbar from the figure window's View menu or by typing
cameratoolbarin the Command Window.Select the type of camera motion control you want to use by either clicking on the buttons or changing the
cameratoolbarmode in the Command Window.Position the cursor over the figure window and click, hold down the right mouse button, then move the cursor in the desired direction.
The display updates immediately as you move the mouse.
The toolbar contains the following parts:

Camera Motion Controls — These tools select which camera motion function to enable. You can also access the camera motion controls from the Tools menu.
Principal Axis Selector — Some camera controls operate with respect to a particular axis. These selectors enable you to select the principal axis or to select nonaxis constrained motion. The selectors are grayed out when not applicable to the currently selected function. You can also access the principal axis selector from the Tools menu.
Scene Light — The scene light button toggles a light source on or off in the scene (one light per axes).
Projection Type — You can select orthographic or perspective projection types.
Reset and Stop — Reset returns the scene to the view when interactions began. Stop causes the camera to stop moving (this can be useful if you apply too much cursor movement). You can also access an expanded set of reset functions from the Tools menu.
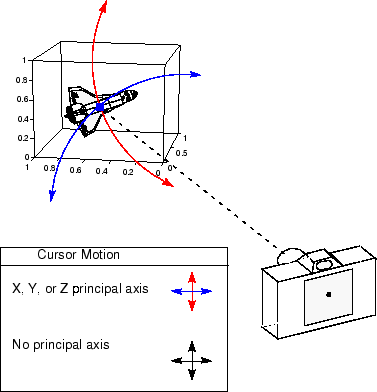
Principal Axes
The principal axis of a scene defines the direction that is oriented upward on the screen. For example, a MATLAB® surface plot aligns the up direction along the positive z-axis.
Principal axes constrain camera-tool motion along axes that are (on the screen) parallel and perpendicular to the principal axis that you select. Specifying a principal axis is useful if your data is defined with respect to a specific axis. Z is the default principal axis, because this matches the MATLAB default 3-D view.
Two of the camera tools (Orbit and Pan/Tilt) allow you to select a principal
axis as well as axis-free motion. On the screen, the axes of rotation are
determined by a vertical and a horizontal line, both of which pass through the
point defined by the CameraTarget
property and are parallel and perpendicular to the principal axis.
For example, when the principal axis is z, movement occurs about
A vertical line that passes through the camera target and is parallel to the z-axis
A horizontal line that passes through the camera target and is perpendicular to the z-axis
This means the scene (or camera, as the case may be) moves in an arc whose center is at the camera target. The following picture illustrates the rotation axes for a z principal axis.

The axes of rotation always pass through the camera target.
Optimizing for 3-D Camera Motion
When you create a plot, MATLAB displays it with an aspect ratio that fits the figure window. This
behavior might not create an optimum situation for the manipulation of 3-D
graphics, as it can lead to distortion as you move the camera around the scene.
To avoid possible distortion, it is best to switch to a 3-D visualization mode
(enabled from the command line with the command axis
vis3d). When using the Camera toolbar, MATLAB automatically switches to the 3-D visualization mode, but warns
you first with the following dialog box.

This dialog box appears only once per MATLAB session.
Camera Motion Controls
This section discusses the individual camera motion functions selectable from the toolbar.
Note
When interpreting the following diagrams, keep in mind that the camera always points towards the camera target. See Camera Graphics Terminology for an illustration of the graphics properties involved in camera motion.
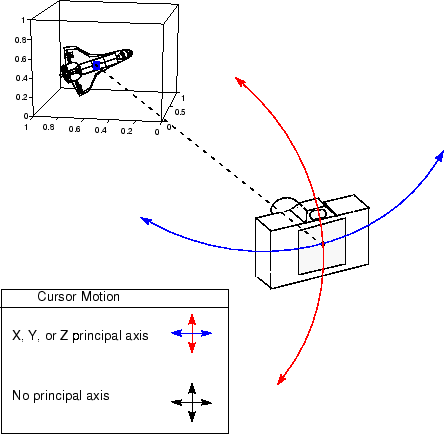
Orbit Camera
![]()
Orbit Camera rotates the camera about the z-axis (by default). You can select x-, y-, z-, or free-axis rotation using the Principal Axis Selectors. When using no principal axis, you can rotate about an arbitrary axis.
Graphics Properties
Orbit Camera changes the CameraPosition
property while keeping the CameraTarget fixed.
Orbit Scene Light
![]()
The scene light is a light source that is placed with respect to the camera
position. By default, the scene light is positioned to the right of the camera
(i.e., camlight
right). Orbit Scene Light changes the light's offset from the
camera position. There is only one scene light; however, you can add other lights
using the light command.
Toggle the scene light on and off by clicking the yellow light bulb icon.
Graphics Properties
Orbit Scene Light moves the scene light by changing the light's Position
property.
Pan/Tilt Camera
![]()
Pan/Tilt Camera moves the point in the scene that the camera points to while keeping the camera fixed. The movement occurs in an arc about the z-axis by default. You can select x-, y-, z-, or free-axis rotation using the Principal Axes Selectors.
Graphics Properties
Pan/Tilt Camera moves the point in the scene that the camera is pointing to by
changing the CameraTarget
property.
Move Camera Horizontally/Vertically
![]()
Moving the cursor horizontally or vertically (or any combination of the two) moves the scene in the same direction.
Graphics Properties
The horizontal and vertical movement is achieved by moving the CameraPosition and
the CameraTarget in
unison along parallel lines.

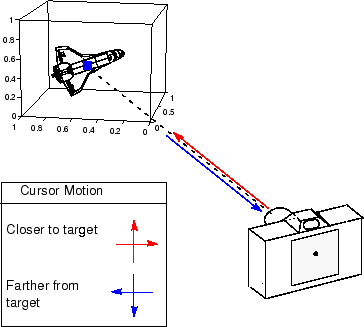
Move Camera Forward and Backward
![]()
Moving the cursor up or to the right moves the camera toward the scene. Moving the cursor down or to the left moves the camera away from the scene. It is possible to move the camera through objects in the scene and to the other side of the camera target.
Graphics Properties
This function moves the CameraPosition
along the line connecting the camera position and the camera target.
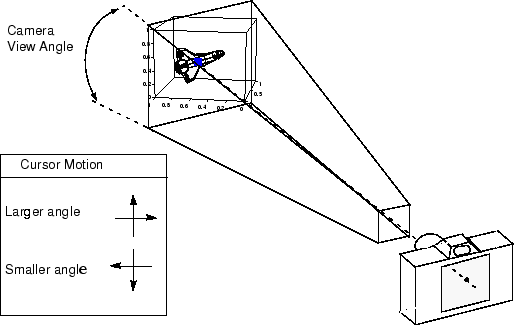
Zoom Camera
![]()
Zoom Camera makes the scene larger as you move the cursor up or to the right and smaller as you move the cursor down or to the left. Zooming does not move the camera and therefore cannot move the viewpoint through objects in the scene.
Graphics Properties
Zoom is implemented by changing the CameraViewAngle.
The larger the angle, the smaller the scene appears, and vice versa.
Camera Roll
![]()
Camera Roll rotates the camera about the viewing axis, thereby rotating the view on the screen.
Graphics Properties
Camera Roll changes the CameraUpVector.
